Titania Delivery Client Connector Guide

Chapter 1: Installation

1.1: Installation

These are the steps to install the Titania Delivery Client Connector SDK.
The Titania Delivery Client Connector SDK requires Java 8. Ensure that Java 8 is installed as the default Java runtime on the system.
  1. Extract the Client Connector SDK package somewhere on your system.
  2. Place the root directory of the extracted archive on your system's PATH environment variable.
    • On Windows, systems, open the Control Panel, select System and Security, select System, then Advanced system settings, and finally click the Environment Variables button on the Advanced tab. Select PATH and add the directory to the end of the value.
    • On Linux or Mac OSX systems, open the .profile file in your home directory, creating it if it doesn't exist, and add the following.
      export PATH=$PATH:/path/to/harp.client-version
  3. Finally, open a command prompt and execute tdsync --help. If the usage information is printed to the console, the application has been installed correctly.

1.2: Install Server Certificate in Local Keystore

In order for tdsync to connect to an https Titania Delivery server, the server's certificate must be downloaded and installed in the local java certificate store.

This document describes two different methods for installing a secure TD certificate on a local machine (PC, Mac, or Unix platform) in order to run tdsync. This should be done by a system administrator. Additional third-party software applications may be required, depending on the method.

Notice: Oberon Technologies makes no endorsement of these applications and cannot provide support for them. The user should comply with all site requirements for installation and use of third-party software. Oberon Technologies accepts no responsibility for any unintended consequences of running these applications.

You'll need to know the hostname of the Titania Delivery server that you intend to connect to. That will be represented with td-host in the following examples.

Locate the java certificate store in your system's JAVA_HOME directory. This may vary depending on your java installation, but will typically be like JAVA_HOME/lib/security/cacerts. That location will be represented with cacerts-file in the following examples.

Note: This file will probably be password-protected. The typical default password is "changeit", but this might have been changed to improve security on your machine. Consult a local system or security administrator if the default password does not work.

Install certificate using KeyStore Explorer

KeyStore Explorer is an open-source GUI application for working with Java keystores. It can be downloaded from http://keystore-explorer.org/. These instructions are for KeyStore Explorer v5.4.4. Other versions may differ in some details.

  1. Start KeyStore Explorer as administrator.
  2. Select Examine Examine SSL .
  3. Enter the td-host in the SSL Host field.
  4. Check Enable Client Authentication.
  5. Browse to cacerts-file location and enter it in the KeyStore field.
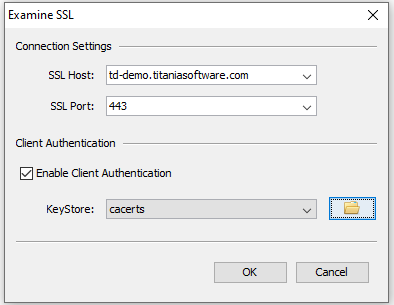
  6. Click OK. The Certificate Details page will appear.
  7. Click Import on the Certificate Details page.
  8. Save the cacerts-file.
  9. Close the KeyStore Explorer application.
Install certificate using openssl and keytool

openssl is an open-source software toolkit for working with Transport Layer Security (TLS) and Secure Sockets Layer (SSL) protocols. Source and binary distributions can be found from the https://www.openssl.org/ website. openssl is installed by default on many Unix platforms.

keytool is a command-line tool that is supplied with most Java Development Kit (jdk) installations.

  1. Issue the following openssl command to obtain the certificate from the server. (You can name the downloaded certificate whatever you like instead of "td-cert.crt".

    In a Windows Powershell console, use a command like this (do not include line breaks in command):

    $null | openssl s_client -showcerts -connect {td-host} 2>$null |
        openssl x509 > td-cert.crt
    

    In a bash terminal, use a command like this (do not include line breaks in command):

    openssl s_client -showcerts -connect {td-host} </dev/null 2>/dev/null |
        openssl x509 > td-cert.crt
    

  2. Install the certificate (do not include line breaks in command). You can use any alias value (instead of "td-cert"), perhaps using the hostname of the TD server.
    keytool -import -trustcacerts -keystore {cacerts-file} -storepass
                changeit -noprompt -alias td-cert -file
                td-cert.crt

Chapter 2: The tdsync Command-Line Utility

The Titania Delivery Client Connector SDK includes a number of command-line utilities to automate the syncing of content and metadata from the local file system to Titania Delivery Projects. The primary command-line tool is called tdsync, a tool for synchronizing a file system folder with a folder or project in Titania Delivery. This tool also includes a number of other advanced features, including the ability to sync more than one folder simultaneously, to upload metadata along with the files, and a "watched folders" feature for automatically uploading files as they are updated locally.

2.1: Simple Usage

This simple procedure will allow you to set up and run a file system sync with a file system folder using the tdsync command-line utility.
Make sure the Titania Delivery Client Connector SDK is installed and that the folder containing tdsync or tdsync.bat file appears on your system's PATH environment variable.
  1. Open a command prompt and navigate to the folder you wish to sync.
  2. Execute the command tdsync --setup.
    This will launch a series of interactive prompts asking for the URL, user name, password, project key, and other settings to use when syncing.
    At the end of the process, a .tdsyncrc file will be created in this directory, containing all the settings necessary to execute a sync.
  3. Execute tdsync --dry-run to see what files will be uploaded to the server. Note that no syncing will actually occur. By default, only those files that differ between the local file system and the Titania Delivery project will be uploaded.
  4. If desired, execute tdsync --pull to download the latest files from the server.
    You could also execute tdsync --pull --dry-run to see what a download would do, without actually modifying any files at either end.
  5. Execute tdsync without any parameters. This will "push" all of the files that are different/missing on the server into the specified Titania Delivery project.
    Alternatively, execute tdsync --force to upload everything in the current directory, including files that are identical.
You can now run tdsync from this folder at any time to sync it with Titania Delivery. You can also use tdsync --watch to watch the folder for changes, which will automatically be synced with the Titania Delivery server as soon as they are made.

2.2: Configuration

The tdsync command-line utility requires a number of settings to function correctly. These values can be specified via a configuration file or via command-line parameter.
Required Parameters

At a minimum, tdsync requires the following settings.

url
The base URL of the Titania Delivery Admin web application (a path ending in /admin/).
username
The login name (e-mail address) to use when authenticating with the Administrative application.
password
The password for the account identified by username.
projectKey
The identifier for the project to sync with. When viewing a project in the Titania Delivery Administrative UI, the project key is the segment of the URL immediately following /projects/.
Specifying Configuration Values

These settings can be specified two ways.

  • They can be specified on the tdsync command-line as parameters. For example:
    tdsync --url https://td.example.com/admin --username demo@example.com \
        --password MyP4ssword --projectKey 970d10c6e4b0ef3ae42407a4
  • They can be specified in a configuration file called .tdsyncrc at the root of the folder to sync. This file follows Java Properties File syntax rules. For example:
    url=https\://td.example.com/admin
    username=demo@example.com
    password=MyP4ssword
    projectKey=970d10c6e4b0ef3ae42407a4

When parameters are passed using both the command line and a .tdsyncrc file, the command-line value takes precedence. This means that you can always override the settings in .tdsyncrc using the command-line. The final, runtime configuration is the combination of the following, in order of precedence:

  1. Command-line parameters.
  2. Settings in the current directory's .tdsyncrc file, if any.
  3. Settings in parent directories' .tdsyncrc files, if present; see below.
  4. Settings in the .tdsyncrc file in the current user's home directory, if present.
Hierarchical Configuration

In addition to the .tdsyncrc file in the directory to sync, the tdsync will look for .tdsyncrc files in its ancestor folders, as well as the current user's home directory. Settings "closer" to the sync root will take precedence over those at higher levels, with the settings in the user's home directory taking the lowest precedence.

This means that if a set of sibling folders shares certain configuration settings, you could place those settings in a .tdsyncrc file at a higher level, and specify only the differences in the sync roots. A user could specify the url, username, and password in their home directory, leaving only projectKey to be specified in folders to be synced.

Optional Settings

In addition to the four required parameters, there are a number of optional configuration settings.

projectFolder
The folder path within the project to sync to. If omitted or set to /, the folder will be synced to the root of the project.
missingFiles
This parameter specifies the sync behavior when a file is present on the server but missing locally. The legal values are as follows.
ignore
Such files will be ignored for purposes of sync. This is the default behavior.
download
Such files will be downloaded from the server and added to the local directory during sync.
delete
Such files will be deleted from the server during sync.
excludes.n
Parameters beginning with excludes., followed by a number, will be treated as file patterns to exclude from sync. The value for this parameter is an Apache Ant-style match pattern.
Note: Exclusion pattern numbers must start at 1 and be contiguous. If a configuration includes excludes.1, excludes.2, and excludes.4, the last will be ignored because excludes.3 is not present.
metadataLoader
The mode for loading metadata associated with the files in the folder. See Setting Metadata for details.
metadataLoader.param
Parameters for the metadata loader are set using keys prefixed with metadataLoader. See Setting Metadata for details.
metadataBehavior
The behavior when syncing metadata with the server. Possible values:
replace
Local metadata from the metadataLoader will fully replace any metadata on the server.
merge
Metadata loaded from the metadataLoader will be merged with what already exists on the server.
skip
The metadataLoader will not be used.
missingMetadata
Specifies behavior for excess metadata keys on an item. Possible values:
delete (default)
Delete metadata keys that are not in the current supplied metadata.
ignore
Excess metadata keys will be ignored.
Sample Full Configuration
# This file contains Titania Delivery sync configuration options.

# Connection settings.
url=https\://td.example.com/admin
username=demo@example.com
password=MyP4ssword

# Project settings.
projectKey=12345
projectFolder=/path/to/folder
missingFiles=delete

# Exclusion patterns. Here we exclude all files and folders whose names
# begin with a period.
excludes.1=**/.*/

# Metadata loader settings.
# Use 'td' for JSON data in META-INF/metadata.json (present in downloaded
# archives). Use 'sdl' to pull metadata from SDL export side-files.
# In this example we're using a custom Metadata loader that requires a
# database URL (dbUrl) as a parameter.
metadataLoader=com.example.td.sync.DBMetadataLoader
metadataLoader.dbUrl=jdbc:mysql://db1:1234/tdmd
metadataBehavior=replace
missingMetadata=delete

2.3: Syncing Multiple Folders

The tdsync tool can be used to synchronize multiple folders in a single run, and to watch multiple folders for changes simultaneously.

By default, the tdsync tool will treat the current folder as the synchronization root. Alternatively, users can specify one or more folders as the trailing command-line parameters to the tool, and the tool will sync each of those independently, as its own synchronization root. If any folder within a synchronization root structure contains a .tdsyncrc file, then that folder will also be treated as a synchronization root, and will not be included in its parent folders' sync.

Take the following command as an example.

tdsync C:\folder1 C:\folder2 C:\folder3

This command will scan all three folders for .tdsyncrc files, and sync each folder containing them independently. If --watch is also specified, it will watch all of those folders for changes, and sync them using their individual configurations as needed.

A folder is considered a synchronization root if its configuration is complete, meaning that all of the required parameters are available either in their .tdsyncrc hierarchies or available from the command-line. If a complete configuration is available from the command-line, then each specified root folder (or, if none are specified, the current folder) will be actively synced as well as any sub-folders containing .tdsyncrc files.

Sample Configuration Hierarchy

Suppose we had the following folder hierarchy and tdsync configuration files.

root
  - .tdsyncrc (contains url, username, and password)
  + folder1
    - .tdsyncrc (projectKey=1)
    + folder1a
      - .tdsyncrc (projectKey=2)
  + folder2
    - .tdsyncrc (projectKey=3)

This folder structure contains 4 .tdsyncrc files, but since the one in root is incomplete (no project key), it contains only three sync roots. In addition, even though folder1a is inside folder1, it is not included in folder1's sync because it is a separate sync root.

We could run tdsync in any of these folders.

  • If we run on root, all three sync roots will be synced.
  • If we run on folder1, both folder1 and folder2 will be synced. Note that we do not need to execute tdsync on root for its configuration to be used by its subdirectories.
  • If we run on folder1a or folder2, only that folder will sync.

2.4: Runtime Parameters

In addition to the configuration settings, there are several command-line parameters that control the runtime behavior of the tdsync tool.
--connect-timeout
The timeout, in milliseconds, to wait for a network connection to the server. The default is 20000 (20 seconds). Set to 0 to disable the timeout.
--delete-search-index
Delete search index and reprocess after uploading. (This will only be effective at the project level.)
--dry-run
List the files to be included or excluded; do not actually sync.
--excludes
Exclusion patterns. May have any number of values.
--force
Normally, only files whose contents differ will be uploaded (or, in the case of --pull, downloaded). When this is present, all files will be affected, not just those that are different.
--help or -h
Prints usage information, and performs no syncing.
--http-trace
Enables verbose printing of HTTP traffic.
--maxchunk-files <count>
Specifies the maximum number of files to include in each payload sent to the server. The default is 1000 files.
--max-upload-size <bytes>
Specifies the maximum size zip file to upload. Sync breaks down the upload package into one or more zip archives for transfer to the server. This specifies the maximum size of zip archive to build before starting a new one. Default is 10 megabytes (10000000 bytes). Use -1 to disable upload package splitting.
--metadataBehavior <arg>
How to handle changed metadata values. Must be one of "skip", "merge", or "replace" (default).
--metadataLoader <className>
Metadata loader class.
--metadataLoader.<param> <value>
Pass parameter named <param> with value <value> to metadata loader.
--missingFiles <arg>
Behavior for extra remote files. <arg> must be one of "ignore" (the default), "download", or "delete".
--missingMetadata <arg>
How to handle excess metadata keys. <arg> must be one of "ignore" or "delete" (default).
--no-check-certificate
If present, then the server's HTTPS certificate will not be validated, allowing the tool to be used with self-signed, expired, or otherwise untrusted certificates. USE WITH CARE.
--password <password>
Password.
--poll
By default, watch mode uses Operating System hooks to watch files for changes. This can fail for certain file system types, such as Windows network drives or other remote file systems. In such cases, --poll instructs tdsync to scan the directories for changes at regular intervals instead of using file system hooks.
--poll-interval <ms>
When -poll is specified, <ms> specifies the poll interval, in milliseconds.
--projectFolder <folderPath>
Folder within the project (specified by --projectKey) where to load files.
--projectKey <key>
Project key of project in which to load files.
--pull
When present, files will be downloaded from the server instead of uploaded from the local file system. Can be used in conjunction with --dry-run and/or --force.
--reprocess or -r
Reprocess other affected files after uploading.
--request-timeout <ms>
The amount of time to wait for a response from the server when sending HTTP requests before failing with an error. The default is 20000 (20 seconds). Set to 0 to disable the timeout.
--setup
Generates a .tdsyncrc file using user prompts.
--url <url>
Base URL of the admin web application.
--username <username>
User name.
--verbose or -v
When present, extra, detailed information will be written to the console during syncing.
--version
Prints version information.
--watch or -w
When specified, the tdsync process will not exit after syncing, instead watching the folder or folders for changes, and uploading those modified files immediately when they are updated.
--watch-only
The same as --watch, but without an initial sync.

2.5: Setting Metadata

The tdsync tool has an extensible mechanism for loading the metadata associated with files being synced. By default, it can load metadata from a JSON file, from a CSV file, or from metadata artifacts generated from certain Content Management System exports. Custom metadata drivers can be implemented in Java.

The metadataLoader configuration setting supports three values by default.

json
This is the default metadata loader. It loads metadata from the HARP-META/metadata.json file, if present.
csv
This loader will look for HARP-META/metadata.csv, and load metadata from that file, if present.
sdl
This loader will look for companion files to the files being synced with the same name but an extension of .MET, as exported by some SDL content management systems.

A custom metadata loader can be specified by using its fully-qualified Java class name.

JSON Metadata Loader

If you download a zip archive from a project or folder using the Titania Delivery admin UI, you'll notice that the downloaded archive contains a file called HARP-META/metadata.json. This file contains all of the user-specified metadata for the files included in the archive. The JSON metadata loader will include the metadata specified by this file.

The structure in this file is a mapping of file paths (optionally including a fragment identifier) to arrays of Metadata values. Each metadata entry has a key, an array of String values, and a boolean field indicating whether the metadata field should cascade.

If the filename includes a fragment identifier (a "#", followed by a string representing a meaningful fragment identifier for a location or region within the document), the metadata will be associated with the fragment, and will be merged with the document-level metadata for searching. Fragment metadata entries should include the special metadata name, _td.fragmentLabel, to supply a readable display label for the fragment. Fragment metadata may be used for navigating to specific locations in a document, when displayed in a portal viewer.

{
  "/file1.dita": [
    {"name": "foo", "value": ["bar"], "cascades": true},
    {"name": "multi", "value": ["a", "b", "c"], "cascades": false}
  ],
  "/path/to/file2.dita": [
    {"name": "foo", "value": ["zed"], "cascades": true},
    {"name": "multi", "value": ["x", "y", "z"], "cascades": false}
  ],
  "/path/to/file3.pdf#page=12": [
    {"name": "about", "value": ["Dopey", "Sneezy"]},
    {"name": "_td.fragmentLabel", "value" ["Page 12"]}
  ]
}

This loader takes no parameters.

CSV Metadata Loader

This metadata loader reads file metadata from metadata.csv. The first column in the file must contain the relative path to the file. The first row names the metadata fields. A metadata name ending with an asterisk (*) indicates that its values should cascade; the asterisk is not included in the metadata name. Multiple values for a field can be represented by additional rows in the CSV structure.

Fragment metadata within a file may be indicated by appending "#" and a meaningful identifier for a location or region in the document. Each fragment should include a value for the special metadata name, _td.fragmentLabel, to supply a readable display label for the fragment.

This loader can take the following parameters.

metadataLoader.csvFile
The relative path to the CSV file. metadata.csv by default.
metadataLoader.csvEncoding
The character encoding of the CSV file, Uses the platform's default encoding by default.
metadataLoader.csvFormat
There is no one standard CSV format. This parameter specifies the "flavor" of CSV for the file. Valid values are as follows.
  • EXCEL (the default)
  • TDF (for tab-delimited format)
  • RFC4180
SDL Metadata Loader

SDL content management offerings can include the metadata associated with documents when they are exported from the system, encoded in files with the same name as the files to which they apply, with .MET on the end. These files contain an XML structure describing the metadata for the file. The SDL metadata loader will read those files and apply the metadata to the file when syncing.

The behavior of this loader can be configured using a separate XML file specifying, among other things, which metadata to include and exclude, mappings from SDL metadata names to Titania Delivery metadata names, and which metadata do and do not cascade.

<metadata-config>
  <!-- Omit metadata not listed in this file; cascade by default -->
  <defaults omit="false" cascades="true" includeEmptyValues="fale"/>

  <field name="FOO" tdname="foo" cascades="true"/>
  <field name="MULTI" tdname="multi" cascades="false"/>
</metadata-config>

The full DTD definition for this configuration file would be as follows.

<!ELEMENT metadata-config (defaults?, field*)>

<!ELEMENT defaults EMPTY>
<!ATTLIST defaults
  omit (true|false) 'false'
  cascades (true|false) 'true'
>

<!ELEMENT field EMPTY>
<!ATTLIST field
  name CDATA #REQUIRED
  tdname CDATA #IMPLIED
  omit (true|false) 'false'
  cascades (true|false) #IMPLIED
>

The configuration file is specified via the metadataLoader.configFile configuration parameter.

The SDL Metadata Loader does not support fragment metadata.

Custom Metadata Loaders

Custom metadata loaders can be implemented in Java by any class that implements the com.titania.harp.client.tdsync.MetadataDriver interface. See the apidocs in the Client Connector distribution for full documentation of this interface. Place the JAR file or files containing any custom implementation, along with any dependencies, into the lib directory of the Client Connector distribution to make it available.