Configuring OpenID Security Profiles

Note: Oberon Technologies cannot guarantee that all OpenID Connect providers are compatible with Titania Delivery and its underlying OpenID framework and implementation. Experience has shown that different software producers have implemented the OpenID and OAuth2 standards in slightly different ways that may be incompatible with Titania Delivery. The OpenID providers that are known to have been configured to work with Titania Delivery are:
  • Microsoft ADFS
  • Salesforce
Note: The Titania Delivery OpenID framework may not work with Symantec SiteMinder v12.8 OpenID providers, due to an incompatibility in handling some values during the protocol exchange.
Note: Current customers who intend to use OpenID authorization should contact Titania Product Support (through their support portal) to arrange testing on a non-production Titania Delivery platform, to verify that their provider and configuration will work as expected. New customers who intend to use OpenID authorization should contact their project manager for support.
Note: Oberon Technologies does not provide detailed technical support for setting up and configuring a customer's OpenID provider.
A Titania Delivery system administrator will need the following configuration items in order to set up an OpenID provider. Consult your OpenId provider’s documentation for details on how to create and register a Titania Delivery instance as an authenticated client application (or relying party).
  1. The “/.well-known” endpoint — this is a provider-specific URL which returns essential information about an OpenID application. Some examples include “https://[server name and app ids]/.well-known/openid-configuration, where [server name and app ids] is the provider host name plus any identifiers specific to the desired client application. Each OpenID provider and each registered client application on the provider will be unique.

  2. The Client Id is generated by the authorization provider when a client application is created by your OpenID system administrator.

    Note: Some providers allow Client Id values to be user-generated.
  3. The Client Secret is also generated by the provider when the client application is created.

  4. When configuring the provider, the OpenID system administrator must specify the redirection URI for your Titania Delivery platform. This URI must conform to the following pattern: https://[hostname]/login/oauth2/code where [hostname] is your Titania Delivery server platform.

    Note: OpenID providers use various names for the redirection URI, such as “Callback URLs” or “Authorized redirect URIs”.

This section describes the configuration of OpenID providers with Titania Delivery. The details of registering OpenID clients such as Titania Delivery vary according to the provider. Titania Delivery follows the OpenID Connect 1.0 specification.
  1. Go to, or create, a Titania Delivery Organization to add a new authentication system.
  2. Click Authentication Systems.
  3. In the Portal Authentication Systems page, click New in the OpenID
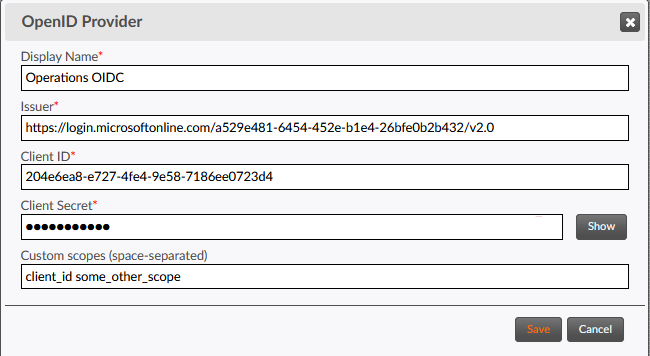
 Providers section.
    The OpenID Provider window will appear.
  4. In the Display Name field, enter a label for the OpenID provider. This label should be unique among all OpenID profiles on your TD platform, to avoid ambiguity when selecting a security profile for a portal.
  5. In the Issuer field, enter your OpenID Provider Issuer URL. (See Section 2 of the OpenID Connect 1.0 specification and your OpenID provider documentation.)
    Note: TD expects to find a JSON document describing the OpenID provider configuration by concatenating /.well-known/openid-configuration to this URL as described in Section 4 of the OpenID Connect 1.0 specification. DO NOT INCLUDE the /.well-known/openid-configuration in the issuer URL.
  6. In the Client ID field, enter the Client Id created or generated when the client application was created by your OpenID system administrator.
  7. In the Client Secret field, enter the Client Secret generated when the client application was created by your OpenID system administrator.
  8. If your OIDC provider requires custom scopes to process an authorization request, enter them in the Custom scopes field, separated by spaces. Otherwise, leave this field blank. If present, custom scopes will be appended to the default scopes used for the OpenID Connect protocol.
  9. Click the Save button.
    Note: Before saving the configuration, the system will validate the issuer URL. If the URL cannot be reached, the configuration will not be saved.
Titania Delivery will display the newly-created OpenID Connect provider in the Portal Authentication Systems window and will store the configuration information, dynamically updating the server configuration.
Note: If the configuration information needs to change, the Save button will update the existing OpenID configuration.
    Note:
  • The OpenID administrator must ensure the authorization provider supports the “openid” scope and either the “email” or the “upn” scopes. This may require modifying the default configuration with some OpenId Connect providers when setting up a client application.

  • The OpenID administrator must ensure the authorization provider complies with Authorization Code flow as described in Section 2.1.5.1 End-User Grants Authorization and RFC 6749.